It was another one of those mornings where I heard the birds chirping before I got out of bed. And then BAM, I looked out the window, expecting to see a lovely spring scene, but the ground was covered in a blanket of fluffy white snow. At least 4 inches of it. *big sigh* We had a snow storm last night that took us right back into the cold and white winter weather!
I guess it IS actually beautiful, with the sunlight sparkling on the new snow covering the branches of the trees out front. It just sadly meant that we had to pull out the kids’ snow suits again, and trudge our way through the freshly fallen snow on the walk to school this morning. We live in Canada, so it feels like spring takes foreeeeeeever to come!
Last week, we had a sneak peak at some spring weather, and I was sooooo excited to see that a few of the spring bulbs I planted last fall (I planted almost 300 spring bulbs so you wouldn’t believe how excited I am!) started to pop through the ground. Besides being super relieved that the squirrels didn’t eat my crocus bulbs (yay!), it gives me hope that the warmer weather is just around the corner!
Even though it’s white and cold outside, and I can hear the snow plow scraping down the road as we speak, I’m going to go ahead and keep “visiting” my spring bulbs (well, maybe tomorrow if the snow melts…) and keep on posting about super cute spring crafts to make with the kids. (… Like these handprint spring lilies and these simple cupcake liner flowers – apparently I’ve got flowers on my mind!)
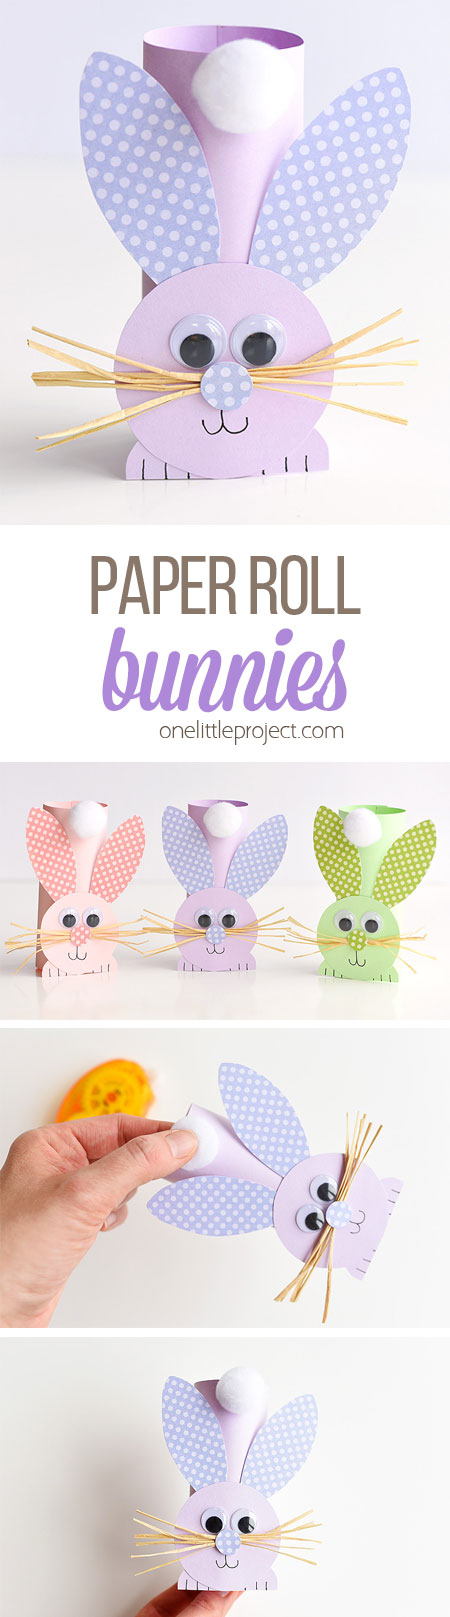
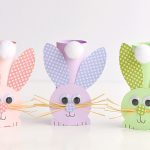
These paper roll bunnies are so adorable! They look like mischievous little rabbits getting ready to pounce. I just love the fuzzy white cotton tails in the air. So cute! I was inspired by the craft over at tout petit rien.
Check out our video on How to Make Paper Roll Bunnies:
Here’s a few more easy and fun Easter craft ideas!
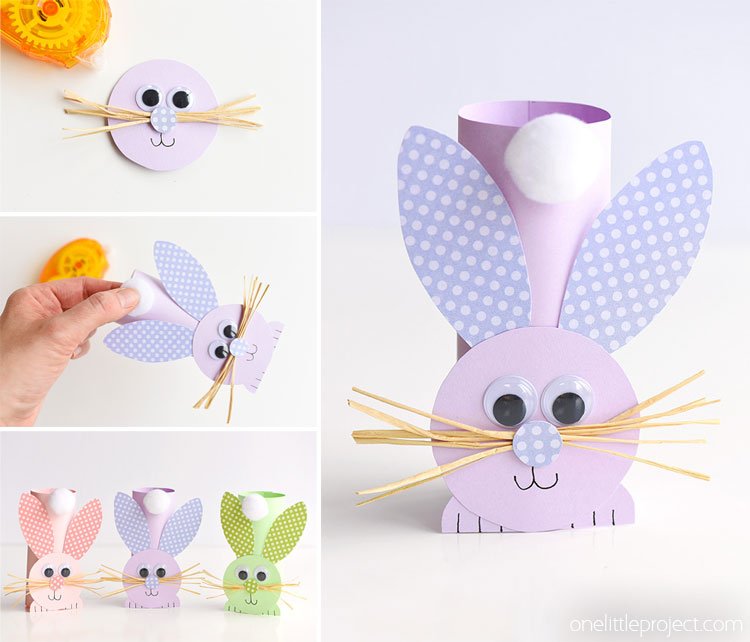
How to Make Paper Roll Bunnies
If you are up for a fun little painting project, by all means, go ahead and paint a few toilet paper rolls! Painting projects tend to scare me off a bit, so I personally prefer to use card stock and roll it into a tube shape. Or you could even wrap a toilet paper roll in paper, like how you would wrap a present. You can choose whatever colour you like, the colour is perfectly consistent and you don’t have to wait for anything to dry. Plus there’s zero mess to clean up!
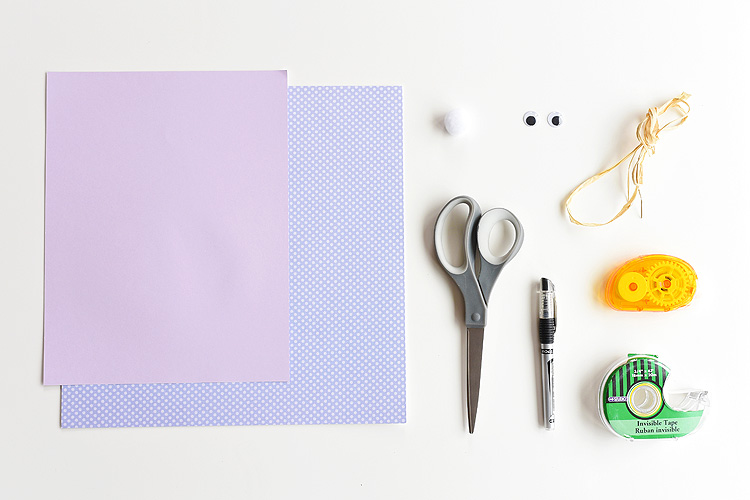
The Amazon affiliate links below will take you to similar products to what I used for this craft. Here’s a list of what you’ll need:
- Coloured cardstock (or a painted toilet paper roll)
- Polka dot scrapbook paper
- White pom pom or cotton ball
- Googly eyes (mine were 15 mm wide)
- Raffia
- Black gel pen
- Crafter’s tape
- Invisible tape
- Scissors
The whiskars are made from “raffia” and yes, I had to look at the package to confirm that that’s what it’s called. It’s that brown, straw like filler that they use in at the bottom of gift baskets. You can usually find it around Easter time with the other Easter “grass” options.
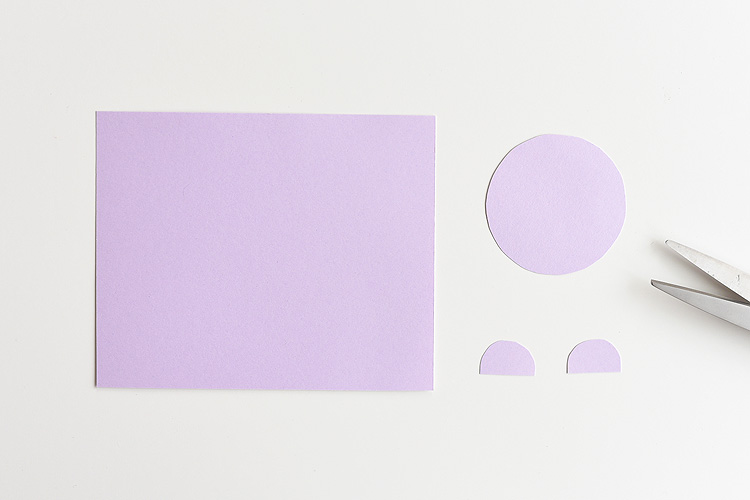
You’ll need to cut out 4 pieces from the solid coloured paper:
- 1 rectangle, about 6″ wide x 4.5″ tall
- 1 circle, about 2″ across (I traced around a small drinking cup)
- 2 half circle paws, about 1″ across
Then you’ll need to cut out 3 shapes from the polka dotted scrap book paper:
- 2 ear shapes, about 3″ tall
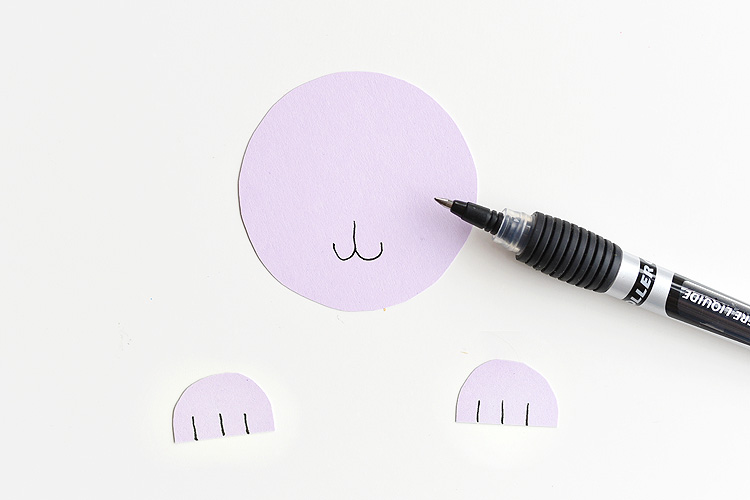
- 1 nose, about 5/8″ across
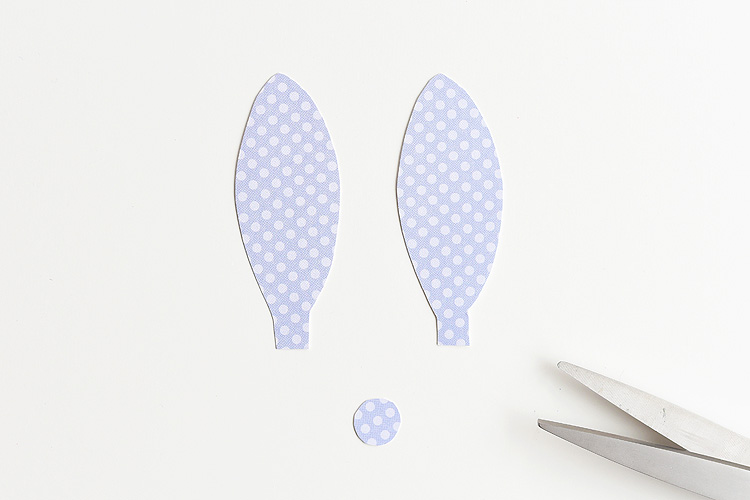
Figure out where the nose is going to go (roughly in the middle of the bigger circle), then draw a small mouth using a black gel pen. Then add three lines along the flat edge of the paw pieces.
Make sure you leave the ink to dry for a few minutes before you touch it. If you touch it right away, it smudges really easily.
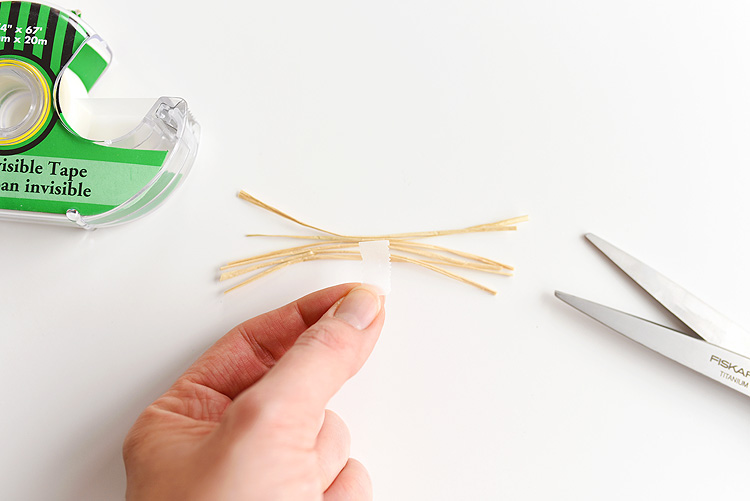
Find the straightest and skinniest pieces of raffia and cut 6 strips to be 4 inches long each. If you don’t have any skinny pieces, cut them to length, add a small snip in the end, and tear them into skinny strips.
Line up the raffia whiskers. Cut a small piece of tape and wrap it around the middle of the whiskers to hold them together.
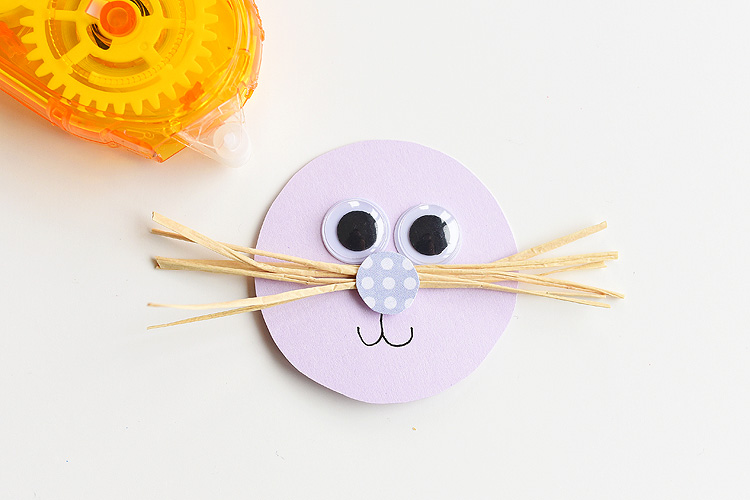
Use crafter’s tape to attach the raffia to the back of the polka dot nose, and then to the middle of the large circle. Then attach the googly eyes, again using crafter’s tape.
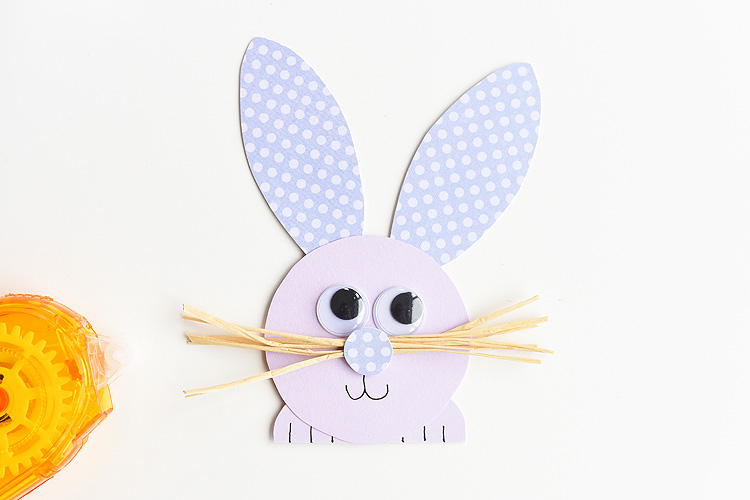
Attach the ears and the paws to the back of the bunny’s face using crafter’s tape.
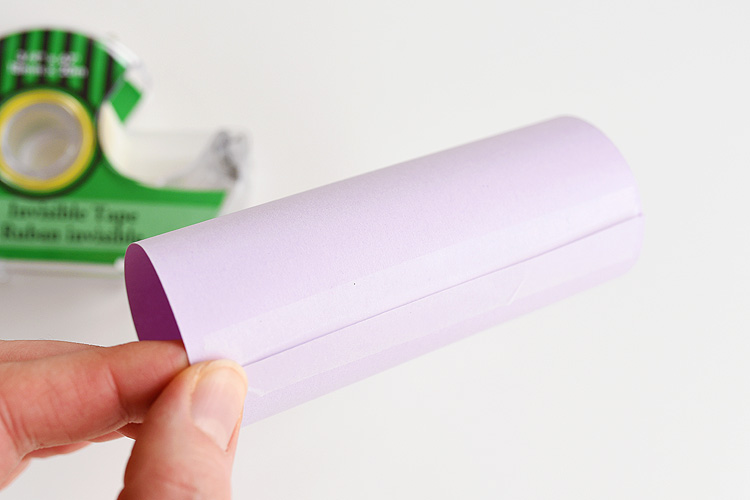
Roll the paper rectangle into a tube shape. You want it to be roughly the same size as a toilet paper roll. Make sure you add tape to the both the inside edge of the paper roll and the outside edge of the paper roll so it sticks together well.
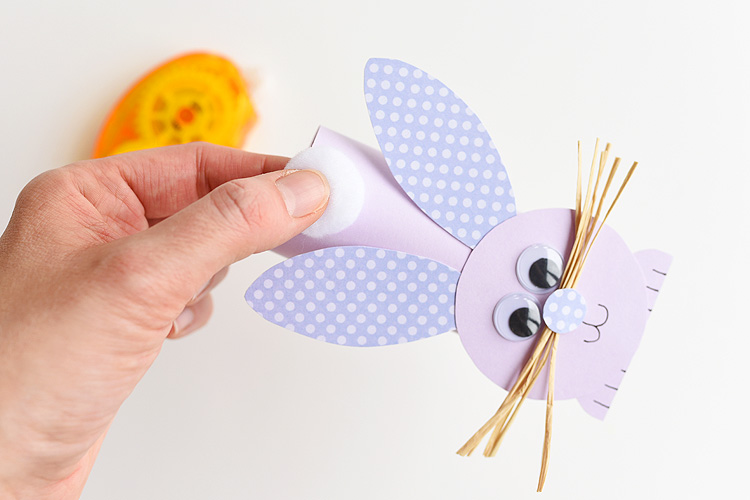
Add a long strip of crafter’s tape straight down the back of the middle of the face, then press it onto the bottom of the paper roll.
Then add about a 1/2″ strip of crafter’s tape at the top, middle of the paper roll and press on the white pom pom.
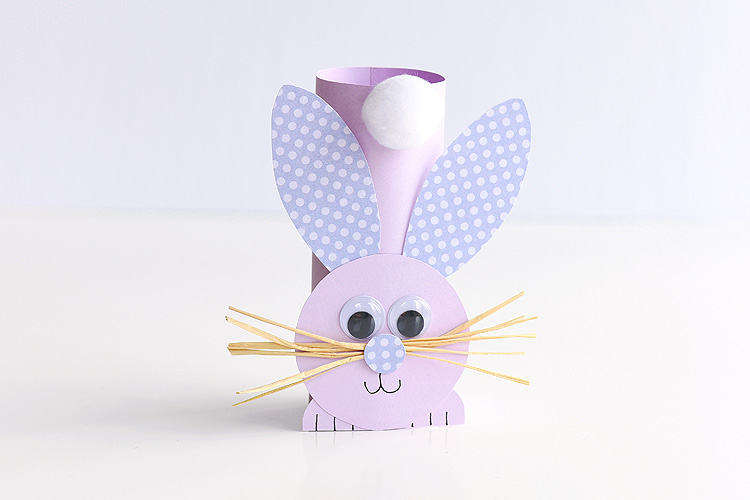
You’re paper roll bunny is complete!
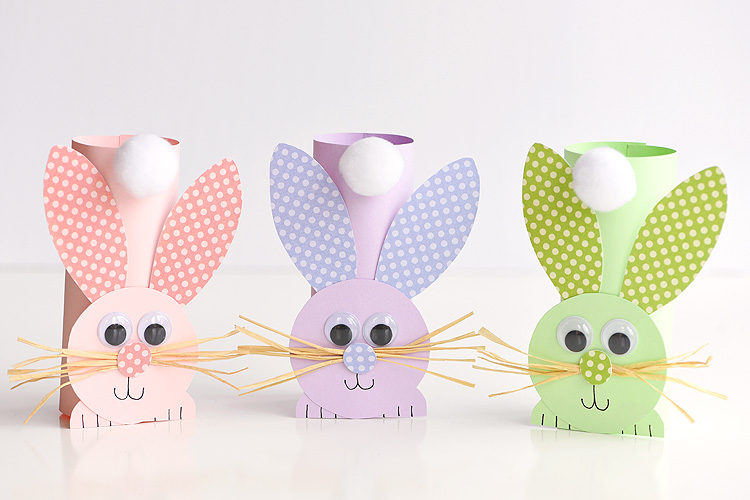
Then try making a few more paper roll bunnies in different colours.
Aren’t they cute?? That little white cotton tail just makes me smile!

If you can’t find any raffia for the whiskers, you could try using pipe cleaners, yarn or even small blades of grass if you can find any dried up ornamental tall grass in your backyard.
Paper Roll Bunnies
Materials
- coloured card stock solid colours
- polka dot scrapbook paper
- white pom pom/cotton ball
- googly eyes (15mm wide)
- raffia
- black gel pen
- crafter's tape
- invisible tape
- scissors
Instructions
- You'll need to cut out 4 pieces from the solid coloured paper: 1 rectangle, about 6" wide x 4.5" tall 1 circle, about 2" across and 2 half circle paws, about 1" across.
- Next, you'll need to cut out 3 shapes from the polka dotted scrap book paper: 2 ear shapes, about 3" tall and 1 nose, about 5/8" across.
- Figure out where the nose is going to go (roughly in the middle of the bigger circle), then draw a small mouth using a black gel pen. Then add three lines along the flat edge of the paw pieces.
- Find the straightest and skinniest pieces of raffia and cut 6 strips to be 4 inches long each. If you don't have any skinny pieces, cut them to length, add a small snip in the end, and tear them into skinny strips.
- Line up the raffia whiskers. Cut a small piece of tape and wrap it around the middle of the whiskers to hold them together.
- Use crafter's tape to attach the raffia to the back of the polka dot nose, and then to the middle of the large circle. Then attach the googly eyes, again using crafter's tape.
- Attach the ears and the paws to the back of the bunny's face using crafter's tape.
- Roll the paper rectangle into a tube shape. You want it to be roughly the same size as a toilet paper roll. Make sure to add tape to both sides of the paper roll so it sticks well.
- Add a long strip of crafter's tape straight down the back of the middle of the face, then press it onto the bottom of the paper roll. Then add about a 1/2" strip of crafter's tape at the top, middle of the paper roll and press on the white pom pom.
- You're paper roll bunny is complete!
These paper roll bunnies are SO CUTE and really easy to make! You can make them from toilet paper rolls, or you can make your own rolls from colored paper. I love the adorable little cotton tail and the cute little whiskers! Such a fun Easter craft idea and a super cute spring craft to make with the kids!
Here’s even more Easter inspired craft ideas!

Source : onelittleproject.com
Read more...


Post a Comment
Post a Comment