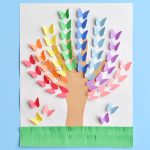
This handprint butterfly tree made from construction paper is SO PRETTY! We used a butterfly paper punch to cut out the butterflies and folded them in half to make them look 3D. This is such a fun way to add a little bit of spring cheer into our lives right now!
This craft takes about 30 minutes to complete. Gluing on all the butterflies definitely takes a bit of time. But it’s also super relaxing and fun to watch it come together! Plus when you’re done, it’s a really pretty keepsake you can put on display somewhere.
All three of my kids made one of these trees. Just to give you an idea of the skill level it takes:
- My 10 year old made hers completely by herself.
- My 7 year old thoroughly enjoyed punching the butterflies and laying them out on the handprint tree trunk, but she wanted my help with the gluing.
- And my 5 year old needed a bit more help. He donated his handprint but he made me do the rest. (But he’s not big into crafts!)

It took me a few tries to get this craft right. The first time I made it, I had all the coloured butterfly “branches” coming out of the tree in straight lines. My 7 year old looked at it and said, “That doesn’t look anything like a tree!?” lol Thanks kid.
So her advice was to make the rows of butterflies curved to make it look more like a tree. And she was right! With a slight curve, it looks way better!
Watch the short video below to see it come together!
Check out our video on How to Make Handprint Butterfly Trees:
Looking for easy crafts you can make using your stash of construction paper? Here’s some more to try:
Paper Strip Rainbows (My new favourite!)
Handprint Butterfly Tree Tutorial:
The full printable list of instructions is at the end of this post. Here’s a list of affiliate links that will take you to products on Amazon that are similar to the supplies we used to make this craft:
- Construction Paper – assorted colours
- Butterfly Punch – 1 inch
- Tacky White Glue
- Pencil
- Scissors
We used almost every single colour of construction paper in our pack. You’ll need all the colours of the rainbow, plus white for the background and brown for the tree.

This is my 5 year old’s hand. Have you ever tried to keep a five year old’s hand still while you stand on a stool over his head trying to take a picture of it? So some of our trunks were more crooked than others! 🙂
Trace a handprint in the middle of a brown piece of paper. Then trace the arm down to the bottom edge of the paper to make the tree trunk. Cut out the handprint and tree trunk.

I “borrowed” (I’m not planning to return it) my mom’s Martha Stewart 1 inch butterfly paper punch. It’s probably 10 years old, so I couldn’t seem to find the identical one on Amazon in the list above.
But any 1 inch butterfly punch should work.

Punch out about 7 or 8 butterflies in all the colours of the rainbow.
We had butterflies that were: Red, Orange, Yellow, Green, Blue, Light Blue, Purple and Pink.

Use your thumb nail to fold the butterflies in half. You can fold them in half with a single fold, or you can use your thumb nail to make two folds on either side of the butterfly’s body so it stands up. Either will work.

Glue the handprint onto the middle of a white piece of paper so that the tree trunk lines up with the bottom of the piece of paper.

What’s the best way to glue the butterflies to the paper?
I recommend using Aleene’s Tacky Glue if you have it. It does a great job of holding the butterflies upright as they dry.
There are two ways you can glue the butterflies to the paper.
- Add a small dot of glue to the crease on the bottom of the butterfly. (I preferred this method)
- Add a small dot of glue onto the paper where you plan to place the butterfly.

Then use a mechanical pencil (make sure the lead is pushed all the way back in) or a toothpick to push the butterfly down into the glue, onto the paper.
Make sure you only press into the middle of the butterfly, not on the butterfly wings, since you want the wings to be raised.

The trickiest part is making sure your butterflies are centered on the handprint. I recommend setting out one butterfly of each colour on the hand before you get started, just to make sure everything fits. (See the image below).
Start with the middle two colours (in my case green and blue), just below the middle finger. Then curve out with the other butterfly colours.

One by one, glue the butterflies on starting with the two middle butterfly colours (in my case green and blue). This well help keep everything straight.
If you start with the reds, your tree might look like it’s blowing in the wind by the time you get to the opposite side. (Or at least mine did!)

After the middle two rows of butterflies, glue on the remaining butterflies, working your way outwards.
Try to give the rows of outer butterflies (the reds and the pinks) a slight curve, to make them look more tree like. (A smart tip from my 7 year old!)

Cut out two strips of green construction paper, the full width of your paper and about 1 inch wide.
Then cut small slits along the long edge to make them look like grass. Bend the edges back and forth here and there to make it “less perfect” and more grass-like.
Glue the grass onto the paper along the bottom edge, overlapping one on top of the other to give it some depth.

Finally, glue on a few stray butterflies under the tree.

If your butterflies look a little flat after they dry, use the mechanical pencil (or toothpick) to bend the wings up again.
And you’re done! Isn’t it pretty??

Handprint Butterfly Tree
Materials
- Construction Paper assorted colours
- Butterfly Punch 1 inch
- Tacky White Glue
- Pencil
- Scissors
Instructions
- Trace a handprint in the middle of a brown piece of paper. Then trace the arm down to the bottom edge of the paper to make the tree trunk. Cut out the handprint and tree trunk.
- Glue the handprint onto the middle of a white piece of construction paper so that the tree trunk lines up with the bottom of the paper.
- With a 1 inch butterfly paper punch, punch out about 7 or 8 butterflies in all the colours of the rainbow, (red, orange, yellow, green, blue, light blue, purple and pink.)
- Using your your thumb nail, fold the butterflies in half. You can fold them in half with a single fold, or you can use your thumb nail to make two folds on either side of the butterfly's body so it stands up.
- Place one butterfly of each colour onto the handprint in the order of the rainbow, making sure they are spaced evenly and centered properly. Glue them in place.
- Glue the butterflies to the paper. You can either add a small dot of glue to the crease on the bottom of the butterfly, or add a small dot of glue onto the paper where you plan to place it.
- Use a mechanical pencil (make sure the lead is pushed all the way back in) or a toothpick to push the butterfly down into the glue, onto the paper, without pushing on the wings.
- One by one, glue the butterflies onto the handprint tree, starting with the two middle rows (in my case green and blue).
- After the middle two rows of butterflies, glue on the remaining butterflies, working your way outwards. Try to give the rows of outer butterflies a slight curve, to make it look more like a tree.
- Cut out two strips of green construction paper, the full width of your paper and about 1 inch wide. Cut small slits along the long edge to make them look like grass. Bend the edges back and forth here and there to make it look more grass-like.
- Glue the grass onto the paper along the bottom edge, overlapping one on top of the other to give it some depth.
- Finally, glue on a few stray butterflies under the tree!

This construction paper handprint butterfly tree is SO PRETTY and it’s really simple to make! The butterflies look 3D on the paper! This is such a great construction paper craft and a super fun kids craft for spring and summer. A great craft to try with bored kids!
Here’s even MORE easy and fun paper craft ideas for you to try out!


Source : onelittleproject.com
Read more...


Post a Comment
Post a Comment